Handout for Small Grains and the Small Farm
This is the handout for a session I presented at the 1999
Northeast Organic Farming Assocation Summer Conference at Hampshire
College on August 15. Note that I don't claim to know a great deal
about small grains - to someone who grew up farming grain in the
Midwest, this page is going to be a daring foray into the depths of
the obvious. However, in coastal New England hardly anyone knows
anything about grain farming and equipment any more, so the following
wasn't achieved without a good bit of effort on my part.
Small Grains
Grasses whose seeds we harvest. The straw (stalks and
seed heads after seeds are extracted) can also be useful: straw bale
houses, mulch, animal bedding. The first signs of cultivation of
wheat date to around 3000 BC in Abyssinia, however shortly thereafter
it is found in Egypt, the birthplace of leavened bread, and by 2700
BC it was being cultivated in China.
Spring grains are planted early, before last frost -
many grains will germinate and grow when soil temperatures are below
40F. Depending on the variety and the climate, they can go to seed
and dry enough to harvest by mid-summer, but I don't believe that you
can do two crops of even Buckwheat in New England.
Winter grains are planted in late summer or early fall,
and establish themselves before going dormant when the ground
freezes. If the plants aren't killed by freeze/thaw drying or frost
heaving over the winter, they take off in early Spring and set seed
with other grasses; however, they aren't harvested until the plants
are completely dead and the seed heads dried out.
- Barley is mostly used as animal feed and for brewing.
- Buckwheat, spring planted and fast growing, is often used as a
smother crop. It is the grain found in Kasha and the Japanese make
"soba" noodles out of buckwheat flour.
- Oats, a spring planted crop, need to be hulled for uses other
than seed.
- Rye: A winter crop, widely used as a cover crop and green
manure, is easy to grow but has no gluten, and has some risk of ergot
contamination.
- Spelt: This is the only grain other than wheat with sufficient
gluten to bake conventional yeast-risen breads.
- Wheat: Both Spring and Winter wheat are widely grown. Hard red
wheat has the most gluten, and supplies the majority of our flour.
Soft red has less gluten, and is used for pasta, among other things.
White wheat has too little gluten for anything except pastry
flour.
Basic grain culture as first developed in the dawn of
agriculture
- Planting: Grain is broadcast seeded by hand into tilled ground,
then raked or dragged to cover the seed.
- Cultivation: Tilling is used to make a seedbed and kill weeds
before planting. Rogueing weeds by hand can help in the middle
stages of growth.
- Cutting: When the whole plant is dry, the base is cut with a
sickle (later scythe or cradle) and manually bundled into shocks. If
the grain still has too much moisture to thresh (the seed heads won't
keep) or store (vulnerable to fungus attack, for example ergot), the
shocks can be left in the field to dry. Once the grain has a low
enough moisture content, the shocks are hauled to threshing floor.
- Shelling: The seeds are removed from the seed heads by beating
the grain on a hard surface, pounding it with a flail, or having an
animal walk on it. (Best done on a smooth floor ie. wood, stone or
pounded earth.)
- Cleaning: Rake the straw out, and toss the mixture of chaff and
grain on a breezy day; the grain will fall fastest, and the chaff
will blow away.
- Storage: Grain must be kept in a dry, rodent- and insect-proof
container until ready to grind into flour or prepare otherwise.
Community granaries were common in ancient times, but sometimes
served as a focal point of power for tyrannical governments.
Major technological advances in grain culture
- Seeding with a "grain drill" - This tool gives a more uniform
seeding rate, and buries the seed at a relatively constant depth,
allowing use of less seed. Many drills are also set up to apply
fertilizer in the same pass over the field. Drill technology hasn't
changed a great deal since the original horse-drawn units appeared in
the mid 1800s.
- A "Reaper" (see Cyrus McCormick, et. al.) cuts the grain using a
sickle-bar mower. The earliest models simply left the grain in heaps
in the field, which still required manual bundling. By the turn of
the century the equipment used "binder twine" to leave bundled grain
in the field to be picked up. Most grain binders were set up for
horse-drawn ground-driven operation, but some tractor-pulled units
(converted or from the factory) may turn up.
- A "Threshing machine" cleaned the grain by feeding the whole
plants against a rotating "cylinder" where bars beat the heads
against a "concave" to loosen the grain. The grain was then
extracted from the mixture of loose grain, chaff and straw by a
vibrating "straw rack", winnowed by a blast of air from a power fan,
and then sieved by screens in a vibrating "cleaning shoe".
Threshers evolved from original treadmill-powered units in the
early 1800s through large belt-driven machines produced until the
W.W.II era. Around the turn of the century these were powered (and
often towed over the road) by steam traction engines, later by
specialized high-HP (for the era) tractors. The manpower required to
haul the bundles of grain in from the field, feed it to the thresher,
and haul away the straw meant that threshers were often used
communally, by a "threshing ring". The ring might own the machine
jointly, or assemble when a traveling thresher owner passed through
at harvest time.
- "Combine harvester": Combines were first developed in
horse-pulled (actually often "horse pushed") form before the turn of
the century. The name comes from their ability to cut the grain and
simultaneously clean it in the field - the grain was sacked or stored
in a bin, while the straw was left behind to be picked up later if
desired.
Combines remained a specialized item until the Depression, used
in areas which specialized in grain and had either manpower shortages
or short harvesting seasons. However, capital equipment (and thus
debt) began to replace manual labor between the wars. Large
tractor-pulled combines began to replace custom threshing on large
grain operations. Meanwhile, as small cultivating tractors began to
become more common on less-specialized sized farms, smaller combines
were developed.
Manpower shortages during W.W.II led to the end of many threshing
rings - for less than the price of a new car a small farmer could do
his own harvest, without the long days, uncertainty and friction
between individuals that often came with community threshing. The
1950s were salad days for farm equipment suppliers, but eventually
easy access to equipment loans under government programs began the
trend to gigantism that prevails everywhere in mainstream farming
these days: Hundreds of thousands of small farmers mechanized, but
now their descendants are mostly working in town, while a small
fraction of the population uses ever larger machines to feed the
urban population.
- "Grain Cleaners": Growing grain for seed purposes often requires
more cleaning than a combine can do on its own - the combine is
designed for high throughput in clean fields, and doesn't do the fine
grading required to eliminate weed seeds that are in the same size
range as the grain. Grain cleaners usually combine a fan for
winnowing chaff and dust with two or more sieves mounted in vibrating
shoes. At least one sieve will be set up to "scalp", or remove
heads, stems and other bits larger than the desirable grain, and one
or more others slightly too small to pass the grain to remove smaller
weed seeds.
Small Grains in New England
Before cheap transportation arrived in the form of railroads and
canals, grain was grown everywhere in New England. However, we had
hills, rocks and a variety of industrial jobs to draw off surplus
labor. Meanwhile in the early days of the westward expansion grain
was the only possible cash crop - little else could travel well
enough to be gotten to market. New England grain growers were so
regularly undercut that by W.W.II the few remaining were mostly
producing animal feed and cover crop seed. Grain milling capability
vanished in parallel.
The New England climate doesn't favor winter wheat - freeze/thaw
cycles often kill the overwintering plants if there isn't reliable
snow cover. Oats and other summer grains do OK, but my crops are
often just maturing as July and August rains spur weed growth. Maybe
I should plant earlier. Winter rye seems to be easy to be successful
with, but most people who plant it do so only to plow it down as a
cover crop. Some rye is grown to be harvested for seed purposes, but
most seed comes from elsewhere.
To date, I haven't found a lot of places in New England to sell
grain other than for seed purposes. Businesses that use grain,
organic or not, usually purchase it already cleaned and milled,
malted or otherwise processed. Facilities equipped to do this
pre-processing are rare outside the grain-growing areas. Right now,
I'm using a small farm sized grain cleaner purchased new by a farmer
a couple of towns away - it's a Hance Vac-Away . Another
manufacturer, which I found on the web but have no personal
experience with, is
Farmstead Products of Hinckley, MN. I have heard of places that
can mill wheat or other grains into flour, but I haven't encountered
anyone with a small-commercial capability to hull or roll oats, or
malt barley.
Instead, my primary long-term purpose in experimenting with grain
is feeding my family and our animals with grain we grow. The whole
thing started after we settled into a routine of baking our own bread
about 7 years ago. From there, we experimented with buying our own
grain and milling it using home-scale tools. This worked well once
we found the right equipment. Meanwhile I had found and brought home
a serviceable grain drill. I put it to work sowing cover crops and
continued doing research on grain harvesting equipment.
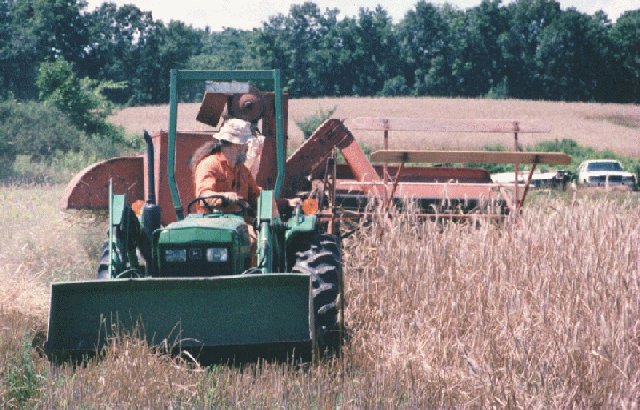
In 1995, I came upon what looked like the right combine: an Allis-Chalmers Model 66 "All Crop Harvester"
a friend had bought as a parts source. I didn't get to fixing it up
until 1997, but since then we've harvested more grain every year.
We've experimented with spring and winter wheat for people, oats for
animals, and winter rye for seed, animal feed and rye flour. We've
also done some custom combining for a
vegetable farmer who uses a lot of rye for cover cropping.
What Do You Need to Start Experimenting?
- 1/4 acre or more of suitable land to till. Grains are not
tremendously sensitive to soil type, but they don't like ground that
is saturated for part of their growing season, and you need to be
able to get equipment on it at the right time: early spring for
planting spring grains, mid- to late- summer for harvesting either
winter or spring grains. I have some areas of well-drained sandy
loam that dry out early, on which I have grown quite respectable
crops.
- Tillage equipment adequate to prepare a 1/4 acre or larger
seedbed. Normally this would be a moldboard plow and some sort of
harrow, but a rotary tiller would also do the job.
- Either a grain drill or a hand seeder and some sort of drag to
cover the seed.
- A serviceable small combine - I've had good luck with
Allis-Chalmers, but I know others using similar models by
International Harvester or John Deere. Not many were made by any
manufacturer after 1960, and many parts are discontinued, but the
combines themselves are easy to find at low prices in grain growing
areas - I've heard reports of prices under $100 for serviceable,
shedded units, and obsolete self-propelled combines can also be had
for scrap prices. The difficulty, of course, is getting something as
big as a combine home from Pennsylvania or upstate New York. Some
ramp-truck owners will haul items this large over the road, others
may require that you dismantle the tongue or remove the header
(cutterbar and apron). If you're planning on heavy use, you may want
to get a parts combine as well.
- A small tractor with 540 RPM PTO and ASAE standard drawbar.
I've heard from people running AC 66s with 25 HP, but that was using
a modern diesel tractor with 8 forward speeds. Older gas tractors
with similar horsepower often had only 4 forward speeds, and could
easily bog down in heavy crops.
- A shed to store the combine in. They will rust out in critical
places if they are stored with wet grain in their innards. My AC 66
needs a space 20 feet long, 14 feet wide and 12 feet high. Other
brands of tractor-pulled combines are likely to be in the same size
range, but most self-propelled combines are larger.
Maintained by James Van Bokkelen